Soil & Fertilization for NZ Native Bonsai: Custom Blends & Feeding
What You Will Learn
Unlock the secrets to a thriving NZ native bonsai. Discover expert custom soil mixes, repotting techniques, and tailored fertilization schedules to elevate your trees with this comprehensive guide.
The art of bonsai transforms majestic trees into living sculptures, a process that demands profound understanding and meticulous care. For those embarking on this rewarding hobby in our region, a great starting point is our guide on Starting Bonsai in Australia & New Zealand. For enthusiasts of NZ native bonsai, this journey takes on a unique dimension. Our indigenous flora, adapted to the specific conditions of Aotearoa, requires a specialized approach, particularly when it comes to the very foundation of their health: their Bonsai Soil, Fertilization & Nutrition. This comprehensive guide will delve into the critical role of a custom NZ native bonsai soil mix, proper repotting techniques, and a tailored fertilization strategy, ensuring your native masterpieces not only survive but truly thrive.
Table of Contents
Importance of Soil for NZ Native Bonsai
Unlike their Asian counterparts, New Zealand’s native trees have evolved in unique soil conditions, often characterized by volcanic origins, high organic matter content, and specific drainage requirements. For instance, understanding the nuances of Elm Bonsai Care: Indoor vs. Outdoor Growing highlights how care varies significantly between species and climates. To broaden your understanding of diverse species, delve into Maple Bonsai Cultivation: Seasonal Care and Styling. Replicating these conditions in a bonsai pot is paramount for success. The right NZ native bonsai soil mix ensures optimal root health, nutrient uptake, and aeration, preventing common issues like root rot and nutrient deficiencies.
“The foundation of a healthy native bonsai lies not just in the artist’s hands, but beneath it, in the very soil that cradles its roots. Ignoring this unique requirement is a recipe for stagnation, or worse, decline.”
Poor soil leads to poor health. Compacted soil starves roots of oxygen, while overly retentive soil drowns them. A well-draining yet moisture-retentive mix is the holy grail, allowing for frequent watering without waterlogging, crucial for the vigorous growth of many native species.
Crafting the Perfect NZ Native Bonsai Soil Mix
Creating your own custom NZ native bonsai soil mix allows for precise control over drainage, aeration, and water retention. This bespoke approach is often superior to generic bonsai soils, which may not cater to the specific needs of our indigenous trees.
Step 1: Understanding Core Components
- Pumice: Excellent for aeration and drainage, while also retaining some moisture. A staple for almost all NZ native mixes.
- Bark (Orchid Bark/Pinus Radiata Bark): Adds organic matter, improves aeration, and provides good water retention. Ensure it’s chunkier for larger trees, finer for smaller ones.
- Scoria/Volcanic Rock: Offers superb drainage and aeration, often used in conjunction with pumice.
- Kiwi Bark Compost (optional, small percentage): For species that prefer slightly more organic matter, adds beneficial microbes and nutrients. Use sparingly to avoid compaction.
- Sand (Coarse Horticultural Sand): Improves drainage, but use with caution as fine sand can compact. Coarse grit is preferred.
Step 2: Sourcing Quality Materials
The quality of your components directly impacts the success of your NZ native bonsai soil mix. Look for horticultural-grade pumice, scoria, and bark. Avoid garden-variety potting mix components that often contain fine peat or uncomposted materials.
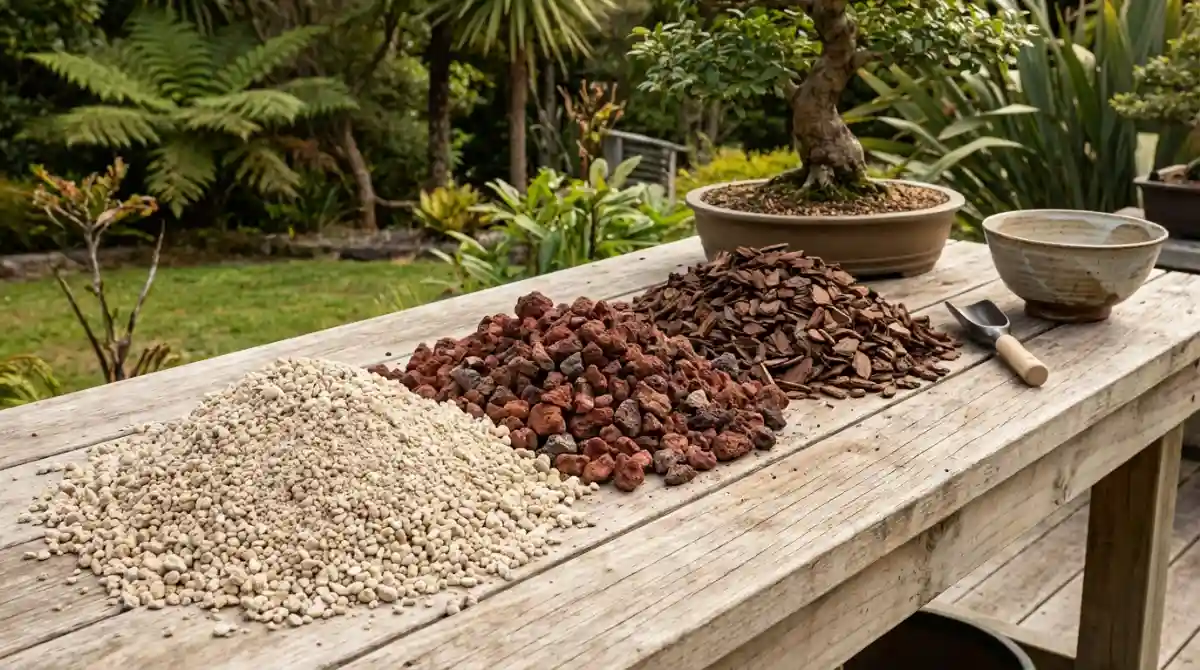
Step 3: Mixing Ratios for Success
While specific ratios can vary based on species and climate, a general starting point for many NZ natives is:
- 50-60% Pumice
- 30-40% Bark (medium to coarse grade)
- 10-20% Scoria or Coarse Sand
For moisture-loving species like some Fuchsias or Coprosmas, you might slightly increase the bark component. For drought-tolerant species like certain Leptospermum (Manuka) or Kunzea (Kanuka), lean towards higher pumice/scoria for sharper drainage. Always ensure thorough mixing to create a homogenous blend.
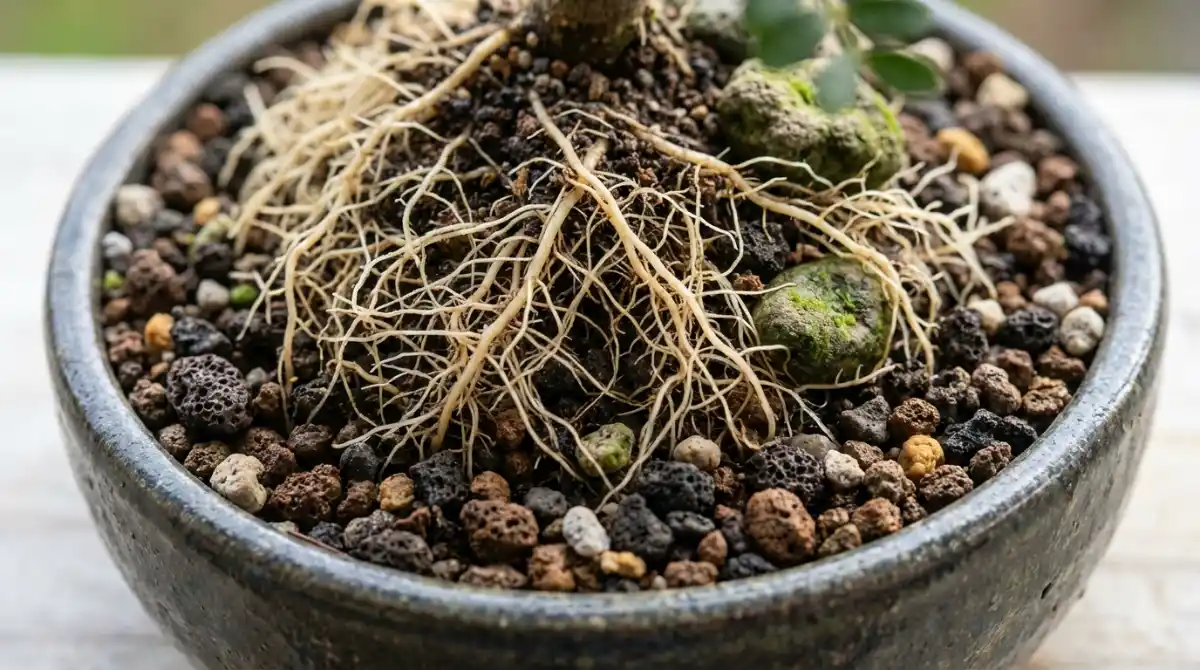
Repotting NZ Native Bonsai: Timing & Technique
Repotting is a critical health treatment, not just a change of pot. It rejuvenates the root system, replaces exhausted soil, and promotes vigorous growth. Doing it correctly for NZ natives is key.
Step 1: Choosing the Right Time
The ideal time to repot most NZ native bonsai is in late winter to early spring, just as the buds begin to swell and before significant new growth emerges. This allows the tree to recover quickly as it enters its active growing season. Avoid repotting during peak summer or deep winter, as this causes undue stress.
Step 2: Preparing Your Bonsai for Repotting
- Water thoroughly: A well-hydrated tree before repotting is more resilient.
- Gather tools: Root hook, root cutters, wire cutters, new soil mix, and the new pot.
- Inspect: Check the tree’s health and root bound status. Young, vigorous trees may need annual repotting; older, refined trees every 2-5 years.
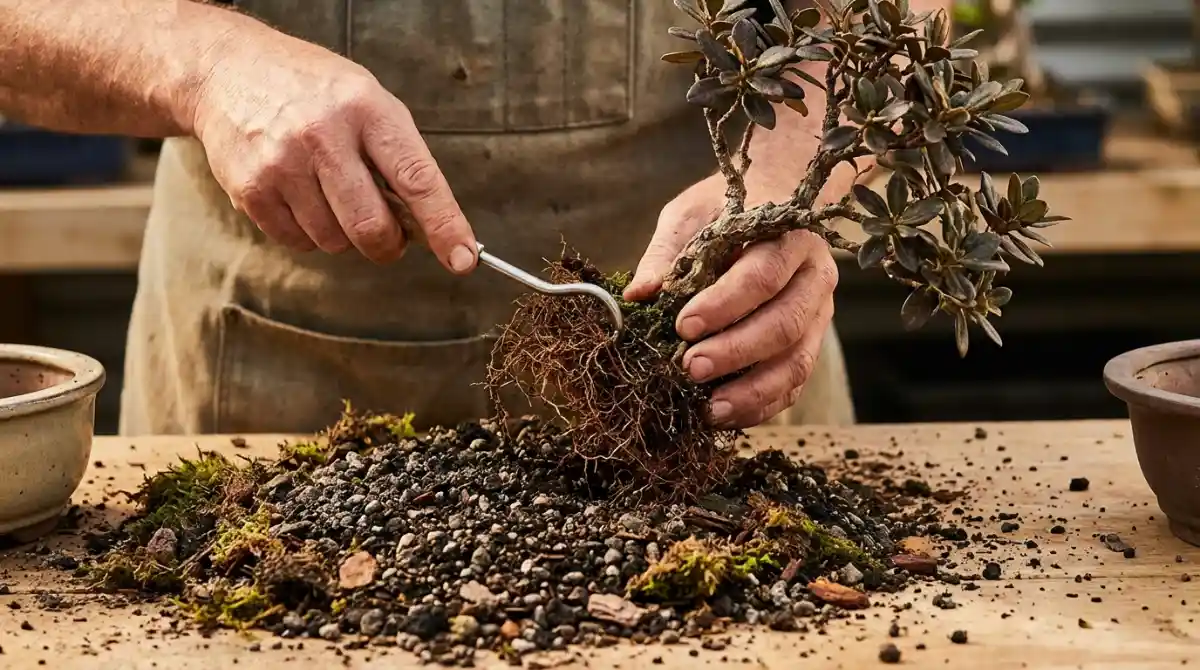
Step 3: The Repotting Process
- Remove from pot: Gently lift the tree, severing any anchor wires.
- Untangle roots: Use a root hook to carefully tease out the outer roots, working from the bottom upwards.
- Root pruning: Remove circling or overly long roots. Aim to create a radial root spread. Generally, remove about 1/3 to 1/2 of the root mass, focusing on thick, old roots and allowing for new feeder root development. For further techniques in shaping and maintaining your bonsai, consider exploring Bonsai Pruning for Refinement and Ramification, and further enhance your artistic vision by learning about Classic Bonsai Styling Forms Explained. Be conservative with sensitive species.
- Prepare new pot: Place drainage mesh over holes and thread anchor wires if used. Add a thin layer of your custom NZ native bonsai soil mix.
- Position tree: Place the tree in the pot, adjusting its height and angle. Secure with anchor wires if necessary.
- Fill with soil: Carefully work the new soil mix into the root ball using a chopstick or similar tool to eliminate air pockets.
Step 4: Aftercare Essentials
After repotting, thoroughly water the tree. Place it in a protected, shaded location for several weeks to allow it to recover without stress. Avoid strong winds or direct, intense sun. Do not fertilize for 4-6 weeks to allow new feeder roots to establish.
Organic vs. Inorganic Fertilizers for the NZ Climate
Choosing the right fertilizer for your NZ native bonsai is crucial. Both organic and inorganic options have their place, but understanding their impact on our unique flora and climate is vital.
- Organic Fertilizers: These are typically slow-release, breaking down gradually through microbial action. Examples include fish emulsion, blood and bone, or commercial organic pellets. For NZ natives, organic fertilizers are often preferred as they mimic the slower, more natural nutrient cycles found in their natural habitats. They also improve soil health and foster a beneficial microbial environment. The downside can be a stronger odor and less precise nutrient control.
- Inorganic (Chemical) Fertilizers: These are fast-acting, providing readily available nutrients. They offer precise control over N-P-K ratios and micronutrients. While effective, inorganic fertilizers can be harsh if over-applied, potentially burning roots, especially in drought conditions or highly porous NZ native bonsai soil mix. They do not contribute to soil structure or microbial life.
For NZ natives, a balanced approach often works best. Many growers prefer liquid organic fertilizers during the growing season for a gentle, steady feed, potentially supplementing with a very dilute inorganic feed if specific deficiencies are observed. Always start with a weaker solution than recommended, especially for sensitive natives.
Developing a Tailored Feeding Schedule for NZ Native Bonsai
A tailored feeding schedule acknowledges the unique growth patterns and nutrient demands of different NZ native species throughout the year.
- Spring (September – November): This is the primary growth period. For comprehensive advice on cultivating healthy native bonsai during this vital season, delve into our guide on Spring Care for Bonsai SH. Begin feeding with a balanced fertilizer (e.g., NPK 10-10-10 or similar) at half strength every 2-4 weeks. For young, developing trees, slightly higher nitrogen can encourage foliage growth.
- Summer (December – February): Growth may slow during the hottest parts of summer, especially for species that prefer cooler conditions. Reduce feeding frequency or switch to a lower nitrogen, higher phosphorus/potassium fertilizer (e.g., NPK 5-10-10) to promote hardening off and general health. Ensure adequate watering.
- Autumn (March – May): As temperatures cool, focus on root development and preparing the tree for winter. Continue with lower nitrogen, higher P-K fertilizers (e.g., NPK 0-10-10 or 2-10-10) every 4-6 weeks. Stop feeding deciduous natives once leaves begin to drop.
- Winter (June – August): Most NZ native bonsai are dormant or semi-dormant. Cease all fertilization. Resume only when signs of new growth appear in late winter/early spring.
Action Checklist for Feeding:
- Observe Your Tree: Look for signs of growth, stress, or nutrient deficiency before feeding.
- Match Species Needs: Research specific nutrient preferences of your native species.
- Dilute, Dilute, Dilute: Always use fertilizers at half strength or less for natives, especially liquid forms.
- Avoid Fertilizing Stressed Trees: Never feed a sick or recently repotted tree.
- Water Before Fertilizing: Ensure the soil is moist to prevent root burn.
- Rinse Periodically: Flush the soil with plain water occasionally to prevent salt buildup, particularly with inorganic fertilizers.

Frequently Asked Questions (FAQs)
Q: Can I use regular potting mix for my NZ native bonsai?
A: No, regular potting mixes are generally too fine, retain too much moisture, and lack the aeration crucial for bonsai, especially NZ natives. They will lead to compacted soil, root rot, and poor health over time. A specialized NZ native bonsai soil mix is essential.
Q: How often should I water my native bonsai after repotting?
A: Immediately after repotting, water thoroughly until water drains from the bottom. For the subsequent weeks, monitor the soil moisture closely. Water when the top inch or two of your NZ native bonsai soil mix feels dry. The frequency will depend on climate, pot size, and specific species, but generally more frequently than before repotting due to the fresh, airy soil.
Q: What are common signs of over-fertilization in native bonsai?
A: Signs of over-fertilization include burnt leaf tips or margins, wilting, yellowing of leaves, stunted growth despite feeding, and a general decline in vigor. If you suspect over-fertilization, immediately flush the soil with plenty of plain water and cease feeding for several weeks.
Q: Is Akadama suitable for NZ native bonsai?
A: While Akadama is a popular component in traditional Japanese bonsai soil mixes, it’s generally not ideal for NZ natives. It can break down quickly in our climate and, more importantly, many NZ natives prefer slightly more acidic conditions than Akadama often provides. Locally sourced pumice and scoria are better alternatives for creating the necessary structure and drainage in an NZ native bonsai soil mix.