Bonsai Photography Tips for Sharing Your Trees

bonzai.co.nz
Bonsai photography tips involve using specific techniques in lighting, composition, and camera settings to beautifully capture the intricate details and overall aesthetic of miniature trees. These tips help enthusiasts showcase their unique living art, making each photograph a compelling visual narrative of the tree’s form, age, and artistic design.
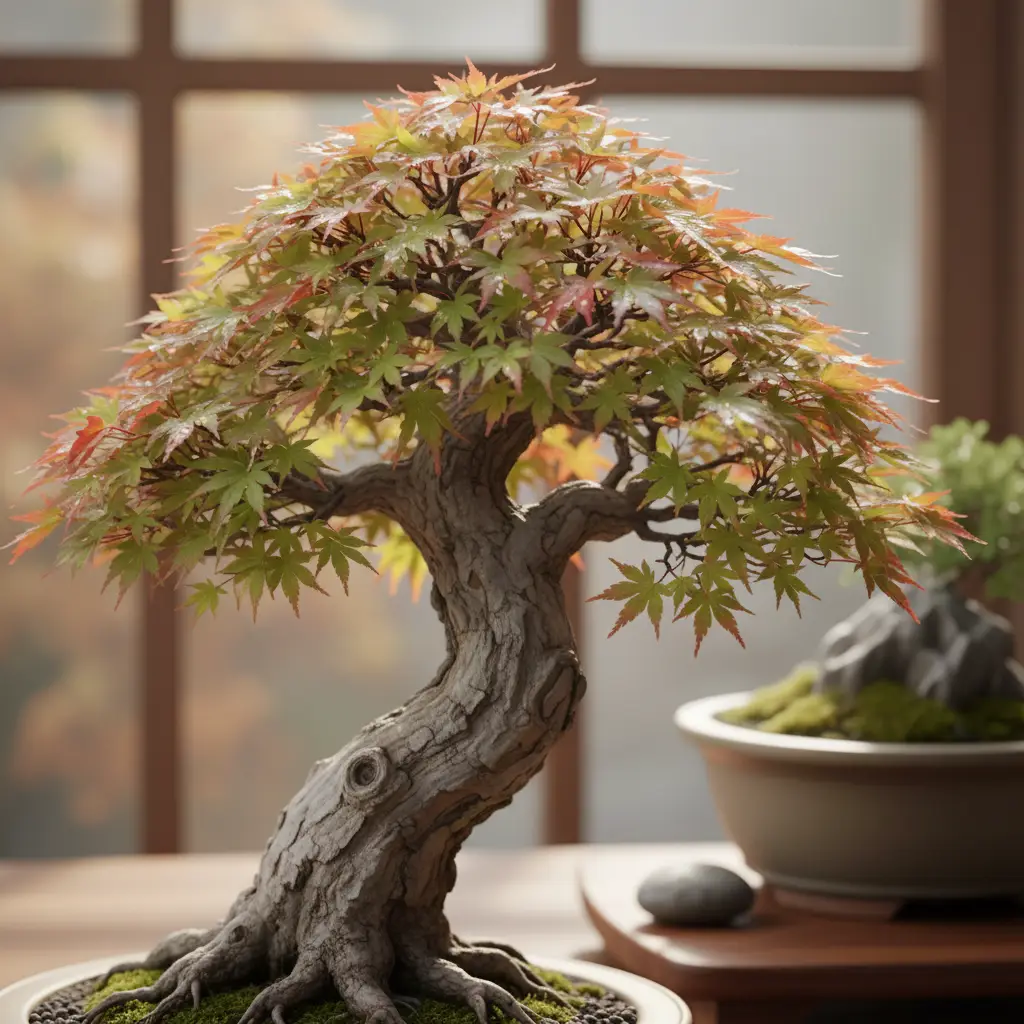
Bonsai is more than just a plant; it’s a living art form. Each tree tells a unique story of growth, patience, and careful cultivation. To truly share this beauty with others, whether online or in print, high-quality photography is essential.
These detailed bonsai photography tips will help you transform your casual snapshots into captivating portraits of your trees. Let’s dive in and learn how to make your bonsai truly shine through the lens.
Beyond individual showcases, actively engaging with the Bonsai Community & Events can further enrich your journey and provide inspiration.
Remember that a stunning photo often begins with a healthy, well-maintained tree. The foundation of a thriving bonsai lies in its care, from Basic Bonsai Watering & Light Requirements, including considerations for Watering Bonsai In Australian Summer, to Bonsai Soil, Fertilization & Nutrition.
For those looking to optimize their tree’s environment, understanding the nuances of substrates is key. You can explore detailed insights on various options with Bonsai Soil Reviews: Akadama, Pumice, Lava Rock, and further delve into the specifics of Understanding Bonsai Soil Mixes.
Best Lighting for Bonsai Photography
Lighting is the single most important element in any photograph. For bonsai, it helps define the tree’s shape, texture, and depth. Getting the light right can make all the difference between a flat image and a dynamic one.
Natural Light: Your Best Friend
Natural light is often the easiest and most beautiful light source. Early mornings and late afternoons, often called the “golden hour,” provide soft, warm light. This light enhances colors and textures, making your tree truly pop.
This gentle light avoids harsh shadows, which can obscure important details of your tree like its nebari (root flare) or delicate branch structures. Overcast days also offer a great, diffused light source, acting like a giant softbox to evenly illuminate your bonsai.
When using natural light, avoid direct midday sun. It creates strong contrasts and harsh highlights that can make your bonsai look washed out or overly dark in shadows. These conditions often flatten the image, losing the three-dimensional quality of your tree.
Position your bonsai so the light hits it from the side or slightly from behind (backlighting). This technique creates a beautiful rim light effect, highlighting its silhouette and delicate branches. A north-facing window can also provide consistent, soft light indoors, ideal for controlled environments.
Using Artificial Light
Sometimes, natural light isn’t available or sufficient. In these cases, artificial lighting can be a powerful tool. Softboxes or LED panels with diffusers can mimic natural light, providing controlled and consistent illumination.
The key is to avoid single, direct light sources that create harsh shadows. These shadows can hide vital features and make your tree appear less appealing. Instead, use multiple lights or bounce light off a white surface to create a softer, more even glow.
Consider using two light sources: a main light for overall illumination and a fill light to soften shadows. Experiment with their positions to highlight the unique features and texture of your bonsai. Remember, gentle light is always best for revealing the intricate beauty of your tree.
You can also use small, flexible LED lights to highlight specific areas of the tree, like intricate bark patterns, delicate leaves, or the dramatic artistry of Creating Deadwood Effects (Jin & Shari) on Bonsai and various Grafting Techniques for Bonsai Development, adding an extra layer of visual interest.
Mastering Composition in Bonsai Photos
Composition is how you arrange elements within your frame. A strong composition guides the viewer’s eye and tells a visual story. It’s about more than just pointing your camera; it’s about intentional design and highlighting the tree’s unique aesthetic.

The Rule of Thirds
One of the most fundamental composition guidelines is the Rule of Thirds. Imagine your image divided into nine equal sections by two horizontal and two vertical lines. This grid helps you place elements strategically.
Place your bonsai’s key features, like its apex or a prominent branch, along these lines or at their intersections. This creates a more dynamic and engaging image than simply centering the tree. It adds visual interest and balance, making the photo feel more professional and artistically arranged.
Background Matters
A clean, uncluttered background is crucial for bonsai photography. The focus should always be on your magnificent tree, not on distracting elements behind it. A busy background can easily detract from the intricate beauty of your subject.
Use a plain wall, a neutral fabric, or even a simple piece of white or black cardboard as a backdrop. Blurring the background with a shallow depth of field can also help make your bonsai stand out, creating a pleasing bokeh effect. Avoid patterns or busy scenes that steal attention from your subject.
Choosing the Right Angle
The angle from which you photograph your bonsai significantly impacts how it’s perceived. Generally, shooting at eye-level with the tree (or slightly below) helps convey its true stature and form. This perspective allows viewers to appreciate its natural silhouette.
Experiment with different angles to emphasize specific features. A slightly lower angle can make the tree appear more majestic, highlighting its height and strength. Focusing on a particular branch or the root flare can bring out intricate detail. Look for the angle that best represents the tree’s unique character and artistic vision. Shooting from above can sometimes reveal the canopy’s shape effectively, particularly for cascade styles.
Depth and Dimension
Create a sense of depth in your bonsai photos by considering foreground, midground, and background. While the background should be clean, a very subtle, blurred foreground element or the stand itself can add context without distracting from the bonsai.
Ensure your tree has room to breathe within the frame, giving it presence and preventing it from looking flat. This use of negative space is vital. This technique helps draw the viewer into the scene, creating a more immersive experience.
- Rule of Thirds: Place the tree off-center for visual balance and dynamic appeal.
- Clean Background: Use simple, neutral backdrops to keep the focus on the bonsai.
- Eye-Level Shot: Capture the tree’s true stature and artistic form.
- Depth of Field: Blur backgrounds (bokeh) to make the tree pop beautifully.
- Negative Space: Allow breathing room around your bonsai to enhance its presence.
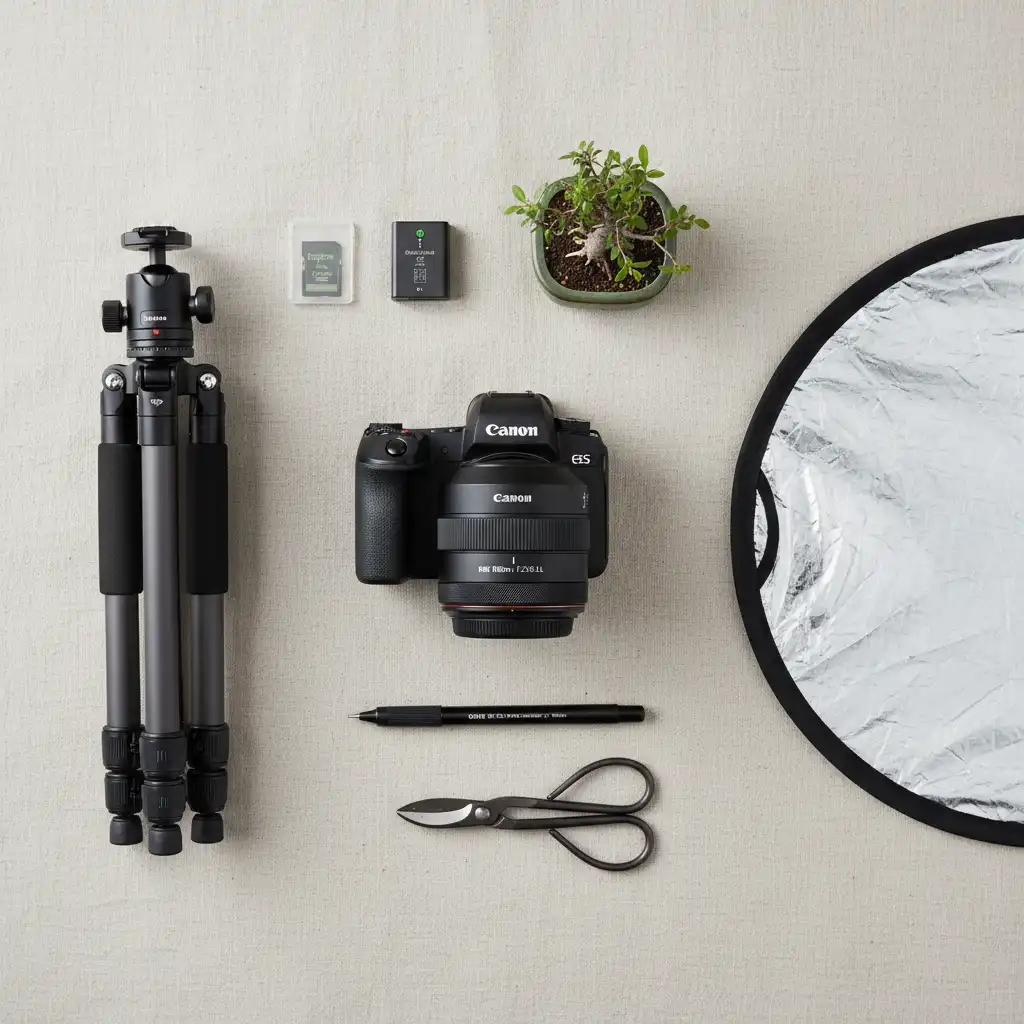
Essential Gear for Better Bonsai Photography
While great photos are possible with just a smartphone, having the right tools can elevate your bonsai photography to the next level. Investing in a few key pieces of equipment can significantly improve your results and allow for more creative control over your artistic captures.
Cameras and Lenses
For serious bonsai enthusiasts, a DSLR or mirrorless camera offers unparalleled control and image quality. These cameras allow you to change lenses, which is crucial for detailed shots and specific photographic styles.
A macro lens is highly recommended as it lets you get incredibly close. This allows you to capture the fine details of bark texture, delicate leaves, and intricate branch structures that define a bonsai’s character. If you’re using a smartphone, ensure it has a good quality camera and consider clip-on macro lenses designed for mobile photography. Modern smartphones are quite capable, especially in good lighting, but dedicated cameras provide more flexibility and professional results.
Tripods and Remote Shutters
A sturdy tripod is an invaluable tool for crisp, blur-free bonsai photographs. It helps stabilize your camera, especially in lower light conditions or when using a slower shutter speed for maximum depth of field. This stability is critical for capturing all the delicate textures without any shake.
Paired with a remote shutter release (or your camera’s self-timer), you can take photos without physically touching the camera. This eliminates even the slightest vibration that could cause blur. This combination ensures the sharpest possible images of your beloved trees, preserving every intricate detail.
Backgrounds and Reflectors
Simple, neutral backgrounds are essential. A roll of seamless paper, a large piece of matte board, or even a clean sheet can work wonders. White, black, or shades of gray are versatile choices that won’t distract from your bonsai and complement its natural colors.
Reflectors, simple white or silver cards, can bounce light back onto shadowy areas of your tree. This softens contrasts and reveals hidden details on the trunk or under the canopy. These inexpensive tools are powerful for controlling light and enhancing the overall quality of your bonsai photography tips application, making shadows less harsh and more natural.
Understanding Your Camera Settings
To truly master bonsai photography, it’s vital to understand how your camera’s settings influence the final image. Moving beyond automatic modes gives you full creative control over light, focus, and depth, allowing you to capture your artistic vision precisely.
Aperture (f-stop)
Aperture controls the amount of light entering your lens and significantly impacts the depth of field (how much of the image is in focus). For bonsai, choosing the right aperture is critical for highlighting the tree’s form.
A larger f-number (e.g., f/8 to f/16) gives you a greater depth of field. This ensures that elements from the foreground, the entire tree, and even the pot are sharp and in focus. This is ideal for showcasing the entire composition.
A smaller f-number (e.g., f/2.8) creates a shallow depth of field, blurring the background beautifully and making your bonsai pop (the “bokeh” effect). However, parts of the tree might be out of focus. Experiment to find the balance that best showcases your tree’s unique characteristics and overall aesthetic.
Shutter Speed
Shutter speed dictates how long your camera’s sensor is exposed to light. For static subjects like bonsai, you typically want a slower shutter speed (e.g., 1/60th of a second or slower) to allow more light in, especially when using a tripod.
This helps achieve proper exposure without increasing ISO too much, which can introduce noise. If shooting outdoors on a breezy day, a slightly faster shutter speed might be needed to freeze any slight movement of leaves or delicate branches, ensuring a crisp image.
ISO Sensitivity
ISO determines your camera’s sensitivity to light. The goal is to keep your ISO as low as possible (typically 100 or 200) to minimize digital noise. Digital noise can make your photos look grainy and reduce overall image quality and detail.
Only increase ISO if absolutely necessary to achieve proper exposure. This might be the case in very dim lighting where you can’t use a slower shutter speed or wider aperture. Low ISO settings are key for clean, detailed bonsai photographs that show off every nuance.
White Balance
White balance ensures that white objects in your photo appear truly white, preventing unnatural color casts. Incorrect white balance can make your beautiful green foliage look yellowish or bluish, distorting the tree’s natural appearance.
You can set it automatically, or manually choose presets like “Daylight,” “Cloudy,” or “Shade” depending on your lighting conditions. For artificial lighting, “Tungsten” or “Fluorescent” presets can be helpful. Fine-tuning white balance helps maintain accurate colors, crucial for representing the health and vibrancy of your bonsai.
Advanced Techniques for Bonsai Photography
Once you’ve mastered the basics, consider these advanced bonsai photography tips to further enhance your images. These techniques can add a professional polish and artistic flair to your collection.
Focus Stacking
For extreme close-ups or when using a very shallow depth of field, it can be challenging to get the entire tree in sharp focus. Focus stacking involves taking multiple photos of the same bonsai, each with a slightly different focus point.
These images are then combined in editing software to create a single image where everything from foreground to background is perfectly sharp. This technique is invaluable for showcasing the intricate details of a large or complex bonsai without compromising sharpness.
Creative Framing
Beyond the traditional eye-level shot, consider how you can creatively frame your bonsai. This might involve using natural elements in the foreground, like blurred branches or stones, to create a sense of depth and context.
You could also experiment with minimalist compositions, isolating the bonsai against a stark background to emphasize its silhouette and form. Think about how the surrounding environment, even if blurred, can contribute to the story of your tree.
Capturing Seasonal Changes
Bonsai trees often display stunning transformations throughout the year. Documenting these seasonal changes can tell a powerful story of life cycles and artistic development. Capture your tree in its spring bloom, lush summer foliage, vibrant autumn colors, or stark winter silhouette. For a deeper dive into species-specific seasonal care, explore Maple Bonsai Cultivation: Seasonal Care and Styling, and for broader advice, consider our guide on Spring Care for Bonsai SH.
Create a series of photos throughout the year to show the tree’s evolution. This not only makes for beautiful individual shots but also a compelling narrative of your bonsai’s journey and the meticulous care involved.
Editing Your Bonsai Photos for Maximum Impact
Even with perfect shooting, post-processing is a vital step in modern bonsai photography. Editing software allows you to refine your images, correct minor flaws, and enhance the visual impact of your bonsai. This can turn a good photo into an exceptional one.
Basic Adjustments (Exposure, Contrast, White Balance)
Start with fundamental adjustments. Correcting exposure can brighten or darken your image to ideal levels. Adjusting contrast helps make details pop and adds depth to your bonsai, defining its features more clearly.
Fine-tune white balance if necessary to ensure colors are natural and true-to-life. These initial steps form the foundation of a great edit, bringing out the best in your original capture.
Cropping and Straightening
Careful cropping can eliminate distracting elements from the edges of your frame and improve overall composition. Straightening a slightly tilted horizon or tree can dramatically improve the professionalism of your photo.
Use the Rule of Thirds grid often available in editing software to guide your crops, ensuring your bonsai is positioned for maximum visual appeal. Don’t be afraid to crop tightly to highlight specific features or the overall form.
Sharpening and Noise Reduction
A subtle application of sharpening can enhance the fine details of your bonsai’s bark, leaves, and overall structure, making the image feel crisper. Be careful not to over-sharpen, as this can create an unnatural, harsh look.
If your photo was taken in lower light or at a higher ISO, you might notice some digital noise. Noise reduction tools can smooth out these grainy areas, improving clarity without losing too much detail. Finding the right balance is key for a clean, professional finish.
Sharing Your Bonsai Art Online
Once your bonsai photos are perfected, it’s time to share them with the world. Effective sharing helps you connect with other enthusiasts and showcase your dedication to this living art. These bonsai photography tips extend to presentation.
Online Platforms
Choose platforms that best suit your audience and goals. Instagram, Facebook groups, and dedicated bonsai forums are excellent for sharing visually rich content and interacting with the bonsai community. Consider creating a personal website or blog to host a more extensive portfolio of your trees.
High-resolution images are appreciated, but also optimize them for web loading speed. Different platforms may have specific aspect ratio or size recommendations, so check these before uploading.
Watermarking
If you’re concerned about protecting your work, consider adding a subtle watermark to your photos. A watermark can include your name, website, or social media handle. It helps ensure proper attribution if your images are shared widely.
Make sure the watermark is discreet and doesn’t distract from the bonsai itself. Its purpose is identification, not obstruction. Many editing software options offer easy watermarking tools.
Storytelling with Captions
A compelling caption can significantly enhance your bonsai photo. Share details about the tree’s species, age, styling history, or any interesting challenges you faced. Engage your audience by asking questions or inviting comments.
This adds context and personality to your image, fostering a deeper connection with viewers. A good story makes your bonsai not just a picture, but a narrative piece of art.
Preparing Your Bonsai for the Camera
Before you even pick up your camera, the preparation of your bonsai is critical. A well-prepared tree looks its best, which naturally leads to more stunning photographs. These preparation bonsai photography tips are essential.
Cleaning Your Tree and Pot
Dust, dirt, water spots, and even old leaves can detract from your bonsai’s beauty. Gently clean the leaves with a soft brush or a damp cloth. Remove any debris from the trunk and branches.
The pot is an integral part of the composition, so ensure it’s spotless. Wipe down the pot to remove water stains or soil residue. A clean tree and pot present a polished and professional image.
Pruning and Wiring
Just before a photoshoot, perform any minor touch-up pruning. Remove any distracting or awkwardly placed leaves, dead branches, or old flowers. The goal is to highlight the tree’s ideal silhouette and structure.
Check your wiring; ensure it’s neat and not distracting. For a comprehensive overview, explore our Bonsai Wiring Techniques: Step-by-Step Guide. If possible, consider removing temporary wires for the photo, or make sure they are discreet. The tree should look perfectly groomed, reflecting your careful cultivation and artistic vision. For detailed guidance on shaping, especially with native species, consider our resource on Wiring & Pruning NZ Natives: Shaping for Optimal Health & Aesthetics.
Selecting the Right Stand or Table
The stand or table your bonsai rests on is part of the overall presentation. Choose one that complements the tree’s style and pot without overpowering it. A simple, elegant stand often works best, elevating the tree and enhancing its presence.
The color and texture of the stand should harmonize with the bonsai, acting as a supportive frame rather than a distraction. Consider the scale; the stand should be proportionate to the tree, adding to the visual balance.
Common Bonsai Photography Mistakes to Avoid
Even experienced photographers can make errors. Being aware of common pitfalls can save you time and help you capture better images of your bonsai. Heed these bonsai photography tips to refine your craft.
Busy Backgrounds
One of the most frequent mistakes is a cluttered or distracting background. Power outlets, messy shelves, or vibrant garden elements can draw the eye away from your bonsai. Always check your background carefully before shooting.
Simplicity is key. Opt for plain walls, neutral fabrics, or open sky to ensure your bonsai remains the undisputed star of the photograph. If shooting outdoors, position the tree to use a natural, uncluttered backdrop like a patch of sky or distant, blurred foliage.
Harsh Lighting
Direct, overhead sunlight or a single, bright artificial light source can create harsh shadows and blown-out highlights. This flattens the image and obscures important details of the tree’s form and texture.
Always seek soft, diffused light. The “golden hour” in natural light, an overcast day, or the use of diffusers with artificial lights will provide a much more flattering and detailed image, revealing the subtle beauty of your bonsai.
Poor Focus
Nothing detracts from a photo more than an out-of-focus subject. Ensure your camera is properly focused on the main trunk or a key feature of your bonsai. For images where the entire tree needs to be sharp, use a narrower aperture (higher f-number) or focus stacking.
Blurriness can also be caused by camera shake. Using a tripod and a remote shutter release is highly recommended to ensure maximum sharpness, especially when shooting with slower shutter speeds.
Ignoring the Pot
The pot is an integral part of the bonsai’s aesthetic. Ignoring its condition or allowing it to be dirty, chipped, or badly placed is a missed opportunity. The pot should complement the tree, not detract from it.
Ensure the pot is clean, well-maintained, and appropriately sized for the tree. It contributes significantly to the overall composition and the story of your bonsai. A beautiful pot enhances the perception of the tree’s artistic value.