Wiring & Pruning NZ Natives: Shaping for Optimal Health & Aesthetics
What You Will Learn
Master wiring NZ native bonsai & pruning techniques for optimal health, aesthetics, and ramification. A comprehensive how-to guide for stunning New Zealand native trees.
Wiring & Pruning NZ Natives: Shaping for Optimal Health & Aesthetics
New Zealand’s native flora offers a stunning, unique palette for the art of bonsai. Their distinctive growth habits and resilience present both exciting opportunities and specific challenges for enthusiasts. Mastering the techniques of wiring NZ native bonsai and strategic pruning is paramount to cultivating healthy, aesthetically refined specimens that truly capture the spirit of Aotearoa’s wilderness. For a deeper dive into these techniques, explore Wiring & Pruning NZ Natives: Shaping for Optimal Health & Aesthetics.
This comprehensive guide will demystify the essential practices, providing you with the expert knowledge to sculpt your native bonsai with confidence, ensuring both their vitality and their breathtaking beauty.
Table of Contents
- Fundamentals of Wiring for NZ Species
- Appropriate Wiring Materials & Gauges
- Pruning Techniques for Ramification & Health
- Deciduous vs. Evergreen Native Pruning
- Avoiding Scars & Promoting Healing
- Action Checklist: Essential Wiring & Pruning Steps
- Frequently Asked Questions (FAQ)
Fundamentals of Wiring for NZ Species
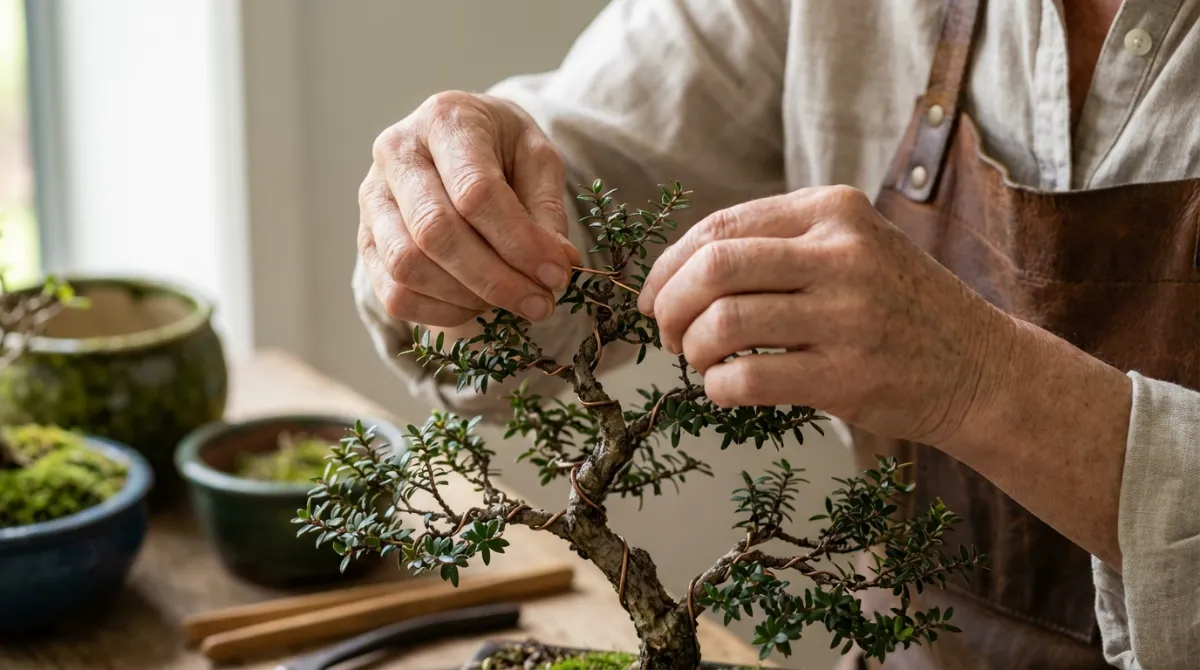
Wiring is the art of gently guiding the growth direction of branches and trunks. For NZ native bonsai, understanding their unique wood structure and growth rates is critical. Many native species have softer wood initially or grow vigorously, making timing and vigilance key to successful shaping without damage.
Step-by-Step: Initial Wiring Application
- Assess Your Tree: Before you even touch the wire, observe your native bonsai’s natural habit. Identify branches you wish to reposition and plan their new trajectory. Consider the overall design and desired aesthetic.
- Choose the Right Time: The best time to wire NZ natives is typically during their dormant or slower growth periods, often late autumn to early spring. This minimises stress and allows the branch to set in its new position before rapid growth begins. Avoid wiring during intense heat or cold.
- Clean the Branch: Gently remove any dead leaves or debris from the branch you intend to wire. Ensure the branch is healthy and free from pests or diseases.
- Anchor the Wire: Start by anchoring the wire securely around the trunk or a stronger main branch, ensuring it doesn’t dig into the bark. Always wire two branches with a single piece of wire if possible, for greater stability and less material.
- Wrap the Wire at a 45-Degree Angle: Apply the wire in a consistent spiral motion, aiming for a 45-degree angle relative to the branch. This provides optimal hold and distributes pressure evenly. Ensure the coils are snug but not tight.
- Shape Gradually: Once the wire is applied, gently bend the branch into its desired position. Do this slowly and carefully, supporting the branch with one hand while bending with the other to prevent snapping. Listen for any creaking sounds – if you hear them, stop immediately.
- Monitor Closely: Regularly inspect your wired branches. As the tree grows, the wire can begin to cut into the bark, causing unsightly scars. This is especially true for fast-growing NZ natives. Remove the wire before it causes damage, typically within 3-6 months.
Appropriate Wiring Materials & Gauges
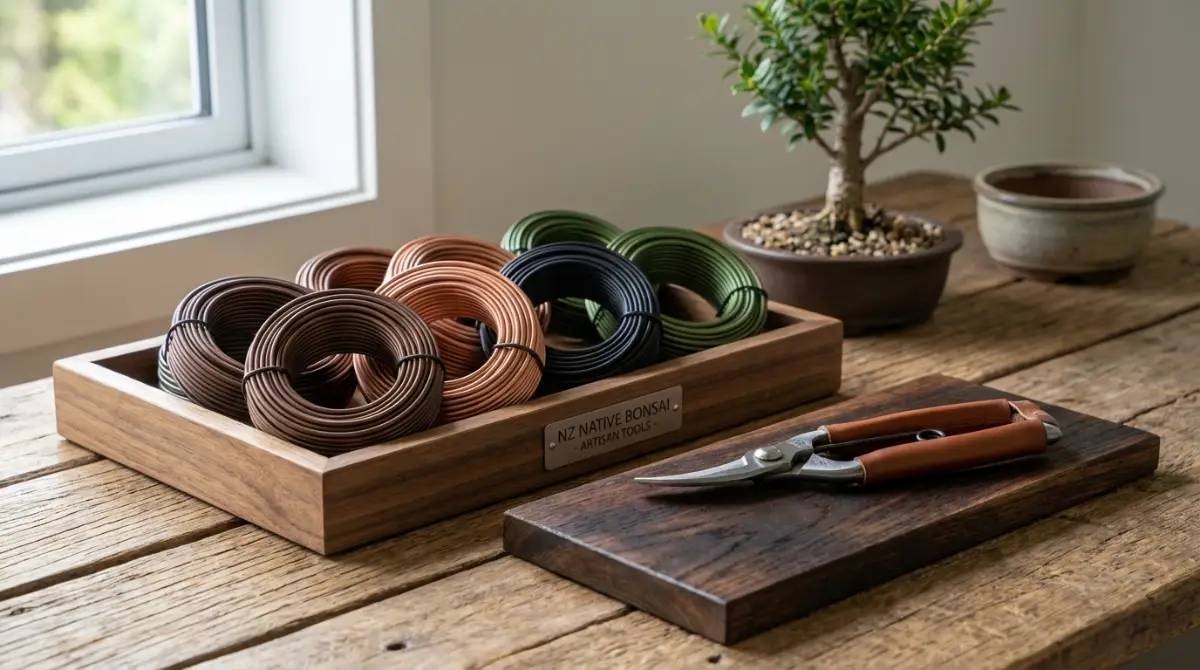
Selecting the correct wiring material is crucial for the health and development of your NZ native bonsai. There are two primary types of wire used in bonsai:
- Anodized Aluminium Wire: This is generally preferred for its flexibility, ease of use, and reusability. It’s softer than copper, making it less likely to damage delicate bark and easier to remove. It comes in a range of gauges.
- Annealed Copper Wire: Stronger and holds its shape better than aluminium, copper wire is often used for older, thicker branches or very rigid wood. However, it oxidises and hardens over time, making it more challenging to remove without scarring if not careful.
Step-by-Step: Choosing & Applying Wire
- Determine Wire Gauge: A good rule of thumb is to use wire that is approximately one-third the thickness of the branch you are wiring. Thicker branches require thicker wire; thinner branches, thinner wire. Always err on the side of slightly thicker rather than too thin, as insufficient rigidity will not hold the branch.
- Measure and Cut: Cut a length of wire about 1.5 to 2 times the length of the branch you intend to wire. This allows for sufficient turns and anchoring.
- Test Flexibility: Before applying, gently bend a small section of the wire to ensure it has enough rigidity to hold the branch’s new position.
- Secure the Anchor Point: Twist the wire firmly around a secure anchor point (trunk or main branch) ensuring it’s stable.
- Uniform Wrapping: Maintain a consistent 45-degree angle for your wraps. Inconsistent angles lead to uneven pressure and reduced effectiveness.
- Overlap for Strength: If wiring a very stiff branch, you may need to use two wires wrapped parallel or with slight overlap for extra holding power.
Pruning Techniques for Ramification & Health
Pruning is the counterpart to wiring, essential for developing fine ramification (the creation of many small branches) and maintaining the health of your NZ native bonsai. It’s a continuous process that shapes the tree’s silhouette and promotes vigour.
“Pruning is not just about removal; it’s about guiding energy, promoting new growth, and refining the tree’s character.” – Expert Bonsai Practitioner
Step-by-Step: Effective Pruning for Natives
- Remove Unwanted Growth: Start by removing any dead, diseased, or crossing branches. Also eliminate branches that grow straight up or straight down, as these often detract from the aesthetic.
- Apex Pruning: To encourage lower branch development and balance, prune the apex (topmost part) of the tree regularly. This redistributes growth hormones (auxins) throughout the plant.
- Branch Reduction: Reduce the length of branches to control the size and shape of the canopy. Cut back to a side branch or bud pointing in the desired direction.
- Leaf Pruning (Defoliation): For certain vigorous native species, partial or full defoliation during the growing season can promote smaller leaves and denser ramification. Research your specific species before attempting, as not all natives tolerate defoliation well.
- Root Pruning: Performed during repotting, root pruning is vital for maintaining the tree’s health in a confined pot. Remove circling roots and about one-third of the root mass, balancing it with canopy reduction.
Deciduous vs. Evergreen Native Pruning
New Zealand boasts a mix of evergreen and a few deciduous native species. Their distinct growth cycles dictate slightly different pruning approaches.
Pruning Deciduous Natives (e.g., Kōwhai, Nīkau Palm)
- Winter Pruning: Major structural pruning is best done in late winter when the tree is dormant and leafless. This allows for clear visibility of the branch structure and minimises sap bleed.
- Growing Season Pruning: Light pruning to maintain shape and remove unwanted shoots can be done during the growing season, but avoid heavy cuts.
Pruning Evergreen Natives (e.g., Pōhutukawa, Rimu, Mānuka, Kānuka)
- Spring/Summer Pruning: Most evergreens respond well to pruning in late spring or early summer after their main flush of growth. This allows them to recover and harden off new growth before winter.
- Light & Frequent: Evergreens generally prefer lighter, more frequent pruning throughout the growing season rather than heavy, infrequent cuts. This promotes dense foliage.
- Avoid Late Autumn Pruning: Pruning too late in the year can stimulate new growth that may be damaged by winter frosts, especially for more tender species.
Understanding these seasonal variations is key to a holistic approach to bonsai care, encompassing not just pruning but also Spring Care for Bonsai SH, Summer Bonsai Care: Heat & Humidity Management, Winterizing Bonsai Trees: Protecting from Cold, and other seasonal maintenance.
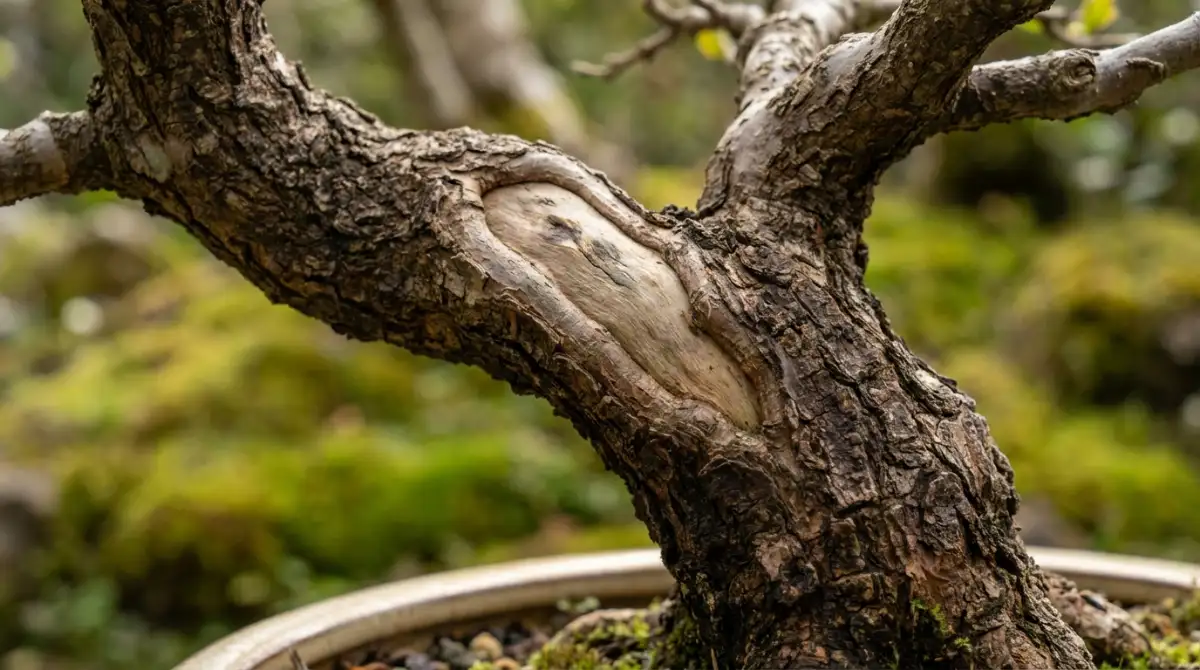
Avoiding Scars & Promoting Healing
Scars on bonsai detract from their natural beauty. Preventing them, especially when wiring NZ native bonsai, is a hallmark of skilled cultivation.
Step-by-Step: Scar Prevention & Healing
- Timely Wire Removal: This is the single most important step. Check your wired branches weekly during the growing season and remove wire as soon as it begins to cut into the bark.
- Proper Wire Application: Ensure wires are snug but not overtight, and applied at a consistent 45-degree angle to avoid uneven pressure points.
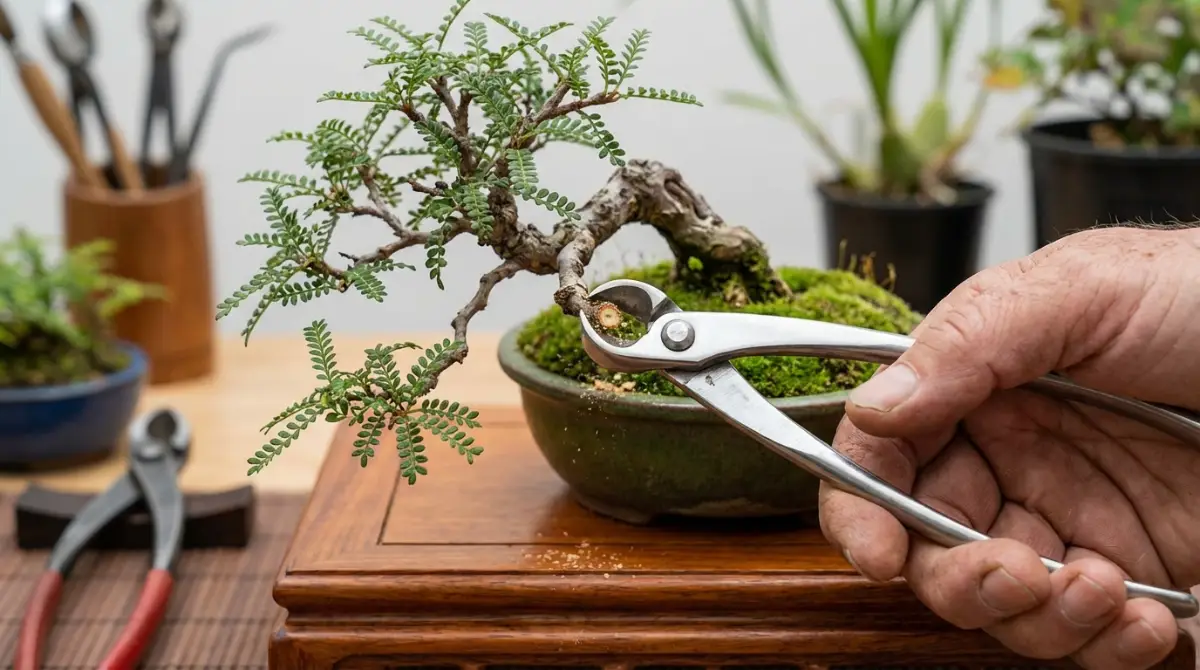
- Concave Cutter Use: When removing branches, use concave cutters to make a slightly hollow cut. This encourages the callus to grow over and seal the wound more effectively, leading to a flatter, less noticeable scar.
- Sealant Application: For larger cuts (over 0.5 cm diameter), apply a high-quality cut paste or sealant specifically designed for bonsai. This protects the wound from pests, diseases, and excessive moisture loss, aiding faster healing.
- Clean Tools: Always use sharp, sterilised tools to make clean cuts. Ragged cuts take longer to heal and are more susceptible to disease.
- Monitor Growth: Keep an eye on the growth around a healing wound. Sometimes, strong growth nearby can help pull callus tissue over the cut.
Action Checklist: Essential Wiring & Pruning Steps
- ✓ Plan your wiring and pruning strategy before making any cuts or applying wire.
- ✓ Select the appropriate gauge and type of wire (aluminium for most natives).
- ✓ Wire at a 45-degree angle, anchoring securely but never too tightly.
- ✓ Monitor wired branches weekly and remove wire at the first sign of girdling.
- ✓ Use sharp, clean concave cutters for all pruning to promote quick healing.
- ✓ Prune deciduous natives primarily in winter, evergreens in spring/early summer.
- ✓ Apply cut paste to larger wounds to protect and assist healing.
- ✓ Regularly inspect your trees for pests, diseases, and wire marks.
- ✓ Balance root pruning with canopy reduction during repotting.
- ✓ Enjoy the journey of shaping your unique NZ native bonsai!
Mastering the art of wiring NZ native bonsai and effective pruning is a journey of continuous learning and observation. By understanding the specific needs of these remarkable trees, including proper watering and applying thoughtful techniques, you’ll cultivate stunning bonsai that celebrate the natural beauty of New Zealand. Practice patience, pay close attention to your trees, and enjoy the profound connection that comes with shaping these living sculptures.
Frequently Asked Questions (FAQ)
Q: How long should wire stay on NZ native bonsai?
A: The duration varies significantly depending on the species, growth rate, and time of year. For most NZ natives, wire should be checked weekly and removed as soon as the branch holds its position or the wire starts to cut into the bark, typically within 2-6 months. Faster-growing species may require removal sooner.
Q: Can I wire all NZ native species?
A: Most NZ native species can be wired, but some are more flexible than others. Species like Totara (Podocarpus totara) and Pittosporum respond well. Others, like certain Hebes, might be brittle and require very gentle handling or alternative shaping methods like clip-and-grow. Always research your specific species. For example, understanding the unique requirements of Kauri Bonsai: Challenges and Long-Term Care of a Majestic Native is crucial for its success.
Q: What’s the best time to prune a Pōhutukawa bonsai?
A: For evergreen NZ natives like Pōhutukawa, the best time for pruning is generally in late spring or early summer, after their main flush of growth. This allows the tree to recover and harden off new growth before the colder months. Avoid heavy pruning late in autumn.