Soil & Fertilization for NZ Native Bonsai: Custom Blends & Feeding
What You Will Learn
Unlock the secrets to thriving NZ native bonsai. Discover custom NZ native bonsai soil mix recipes, repotting techniques, and tailored fertilization schedules for peak health and aesthetic refinement. Master native bonsai care.
Unlocking the Secrets Beneath: Soil & Fertilization for Thriving NZ Native Bonsai
For the dedicated enthusiast of NZ native bonsai, the journey towards high-end aesthetic refinement begins not with the prune of a branch, but with the very foundation of the tree’s existence: its soil and nutrient supply. Unlike their exotic counterparts, New Zealand’s unique flora demand a nuanced approach to cultivation, especially when confined to a bonsai pot.
Understanding the specific needs of these indigenous treasures – from the rugged Pōhutukawa to the delicate Kauri – is paramount. This guide delves deep into crafting the perfect NZ native bonsai soil mix, mastering repotting, and developing a tailored feeding schedule that respects the delicate balance of our native ecosystems. Prepare to elevate your native bonsai artistry through foundational knowledge. For a comprehensive overview of general Bonsai Soil, Fertilization & Nutrition, consult our main resource.
Table of Contents
The Unseen Foundation: Why Soil Matters for NZ Native Bonsai
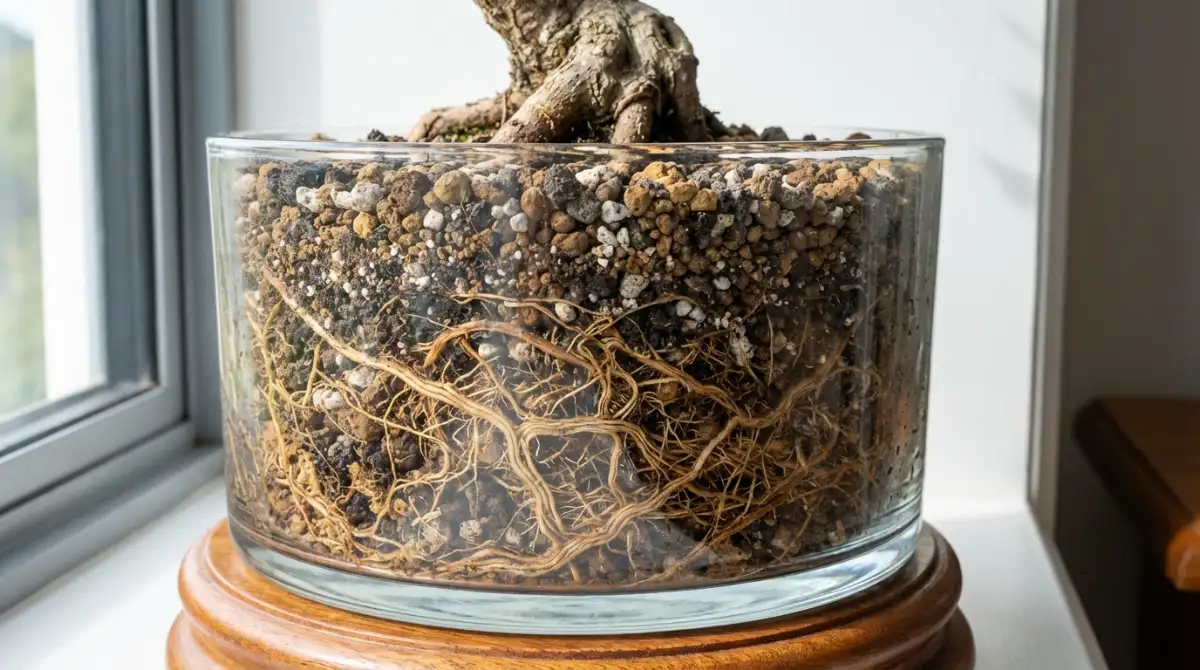
The soil in a bonsai pot is far more than just an anchoring medium; it is a meticulously engineered microcosm that dictates the health, vigor, and aesthetic potential of your native tree. For New Zealand’s unique flora, accustomed to specific soil types, drainage, and nutrient availability in their natural habitats, replicating these conditions is a delicate art.
Poor soil choice can lead to a cascade of problems: root rot due to insufficient drainage, nutrient deficiencies from incorrect pH or compaction, and ultimately, a struggling or dying tree. A superior NZ native bonsai soil mix ensures optimal root development, aeration, water retention, and nutrient exchange, directly translating to lush foliage, robust growth, and the distinctive character you seek in high-end native bonsai.
“In bonsai, the roots are the soul of the tree, and the soil is its very breath.” – A core principle of successful cultivation.
Crafting the Perfect NZ Native Bonsai Soil Mix: A Step-by-Step Guide
Creating the ideal substrate for your NZ native bonsai requires a balance of inorganic and organic components, tailored to provide excellent drainage, aeration, and moisture retention without becoming waterlogged. Here’s how to formulate a custom blend:
1. Understand the Core Principles
NZ natives generally prefer free-draining, slightly acidic to neutral soils. The mix must prevent compaction, allow roots to breathe, and retain enough moisture and nutrients to support the tree between waterings. Avoid heavy, moisture-retentive garden soil at all costs.
2. Select Your Inorganic Components
- Pumice (approx. 40-50%): Excellent for drainage and aeration, lightweight, and retains some moisture. Sourced locally in NZ.
- Scoria (approx. 20-30%): Provides superb drainage and aeration, less moisture retention than pumice.
- Gritty Sand or Fine Gravel (optional, 10-20%): Enhances drainage further, particularly useful for species that absolutely detest wet feet. Ensure it’s horticultural grade, not builders’ sand.
- Crushed Bark/Pine Bark Fines (approx. 10-20%): Adds organic matter, improves water retention slightly, and helps to maintain a slightly acidic pH as it decomposes slowly. Ensure it’s aged and sterile.
3. Incorporate Organic Elements Sparingly
- Coarse Peat Moss or Coco Coir (approx. 5-10%): For moisture and nutrient retention. Use sparingly to avoid excessive waterlogging. Ensure coco coir is pre-rinsed to reduce salt content.
- Composted Bark (approx. 5-10%): Provides stable organic matter and some nutrient content.
4. Mix and Sieve
Thoroughly combine your chosen components. For best results, sieve the mixture to remove very fine dust particles that can hinder drainage and very large pieces that create air pockets. Aim for particle sizes between 1-5mm for most natives.
5. Adjust for Specific Species
While the general NZ native bonsai soil mix above is a great starting point, some species have specific preferences:
- Water-lovers (e.g., some Podocarpus): Increase organic content slightly.
- Dry-tolerant (e.g., some Hebe, Leptospermum): Increase inorganic, particularly scoria/pumice.
- Acid-lovers (e.g., certain Ericaceae relatives): Incorporate a higher proportion of pine bark fines.
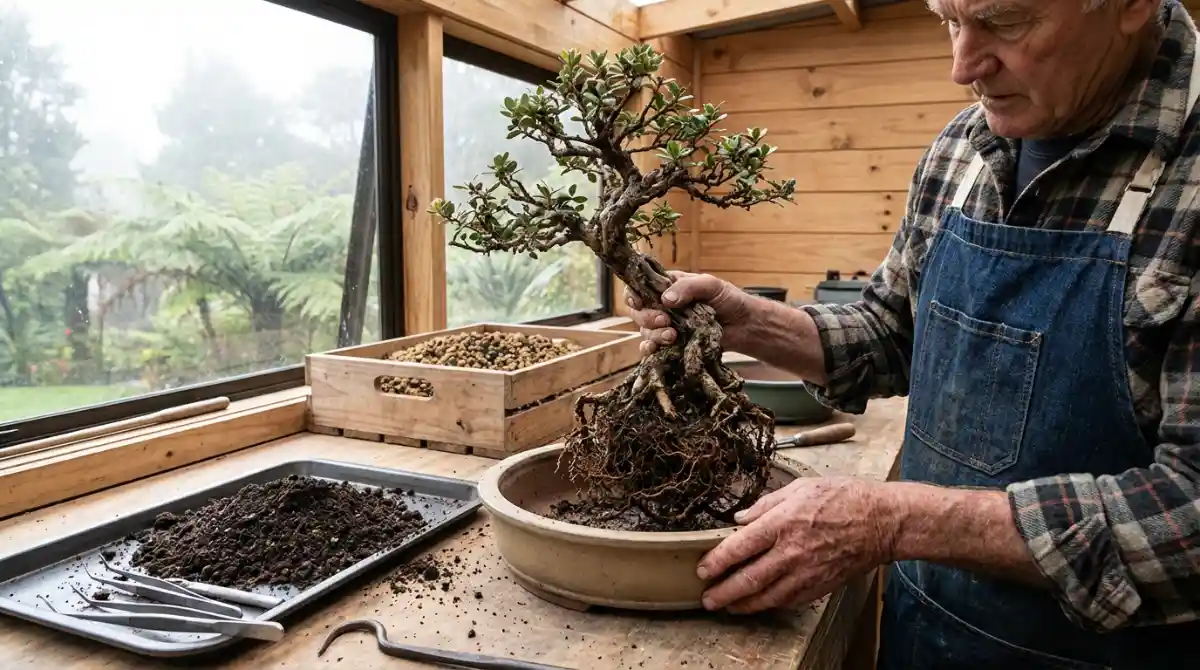
Repotting NZ Natives: Timing & Techniques for Minimal Stress
Repotting is a critical procedure that invigorates your bonsai, allows for root pruning, and replenishes exhausted soil. For NZ natives, careful timing and gentle technique are paramount to prevent shock.
1. Optimal Timing
The best time to repot most NZ natives is in late winter to early spring, just before the buds swell and new growth begins. This allows the tree to recover quickly as it enters its most active growth phase. Avoid repotting during hot summer months or deep winter.
2. Prepare Your Tools & Soil
Ensure you have sharp, sterilized concave cutters, root hooks, chopstick, wire mesh for drainage holes, and your prepared NZ native bonsai soil mix ready. Work in a shaded area to prevent root desiccation.
3. Gentle Removal & Root Pruning
Carefully remove the tree from its pot. Using a root hook, gently tease out the old soil from the root ball, working from the outside in. Avoid tearing roots. Prune any thick, circling, or damaged roots using sharp cutters, aiming to create a radial root system. Generally, remove no more than 1/3 of the root mass, though this can vary by species and tree health.
4. Repotting into Fresh Soil
Place a layer of fresh soil mix at the bottom of the pot, mounding it slightly. Position the tree, ensuring its nebari (root flare) is at the desired level. Carefully work the new soil around and through the roots using a chopstick to eliminate air pockets. Ensure the soil level is slightly below the rim of the pot to allow for watering.
5. Post-Repotting Care
Water thoroughly immediately after repotting until water runs clear from the drainage holes. Place the tree in a sheltered, shaded location for several weeks to recover. Avoid strong winds and direct harsh sunlight. Hold off on fertilizing for 4-6 weeks to allow new feeder roots to establish.
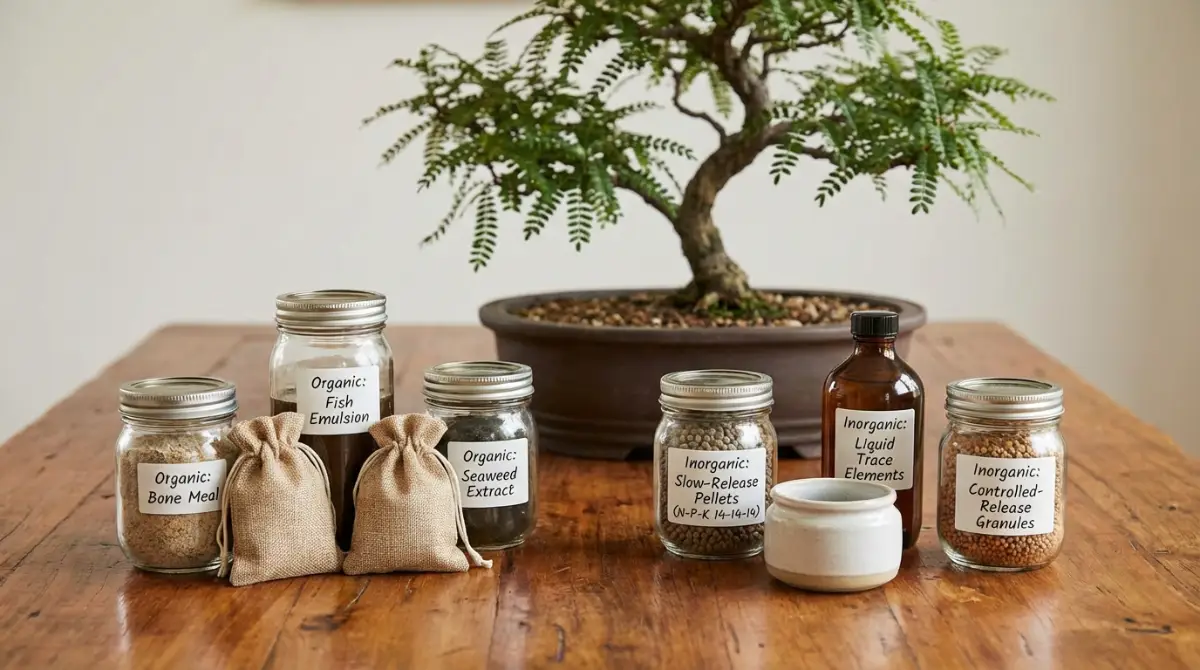
Organic vs. Inorganic Fertilizers for NZ Climate & Natives
Fertilization provides the essential nutrients not naturally replenished in a bonsai pot. For NZ natives, the choice between organic and inorganic fertilizers depends on your cultivation philosophy and the specific needs of your trees and the unique New Zealand climate.
Organic Fertilizers
Organic fertilizers, such as fish emulsion, seaweed extracts, composted animal manures, or solid organic cakes, release nutrients slowly as microorganisms break them down. This provides a gentle, sustained feeding that mimics natural processes and improves soil health. They are less likely to burn roots and are generally preferred for their holistic benefits.
- Pros: Gentle, slow-release, improves soil biology, less risk of root burn, suitable for the long-term health of native species.
- Cons: Can have an odor, slower visible results, precise nutrient ratios harder to control, may attract pests or fungi if not managed well.
Inorganic Fertilizers
Inorganic (chemical) fertilizers deliver precise nutrient ratios (N-P-K) in a readily available form. They are fast-acting and can be precisely controlled, making them useful for addressing specific deficiencies or promoting rapid growth. However, they carry a higher risk of root burn if over-applied, especially in the sensitive root systems of some natives.
- Pros: Fast-acting, precise nutrient control, no odor, clean to use.
- Cons: Higher risk of root burn, can harm beneficial soil microorganisms if used excessively, requires careful dilution and application.
For NZ native bonsai, a balanced approach often works best: using organic fertilizers for general health and sustained growth, supplemented with dilute inorganic fertilizers for specific growth objectives or to correct deficiencies, especially during the active growing season. Always err on the side of caution and use half the recommended strength, particularly with sensitive natives.
Developing a Tailored Feeding Schedule for NZ Native Bonsai
A successful feeding schedule aligns with the tree’s natural growth cycles and the specific climate of New Zealand. Over-fertilizing is far more detrimental than under-fertilizing for native species. While this guide focuses on the specific rhythms of NZ natives, a comparison with the practices for other species, such as outlined in Maple Bonsai Cultivation: Seasonal Care and Styling, and for additional guidance, Maple Bonsai Care Tips, can offer valuable insights into adapting techniques.
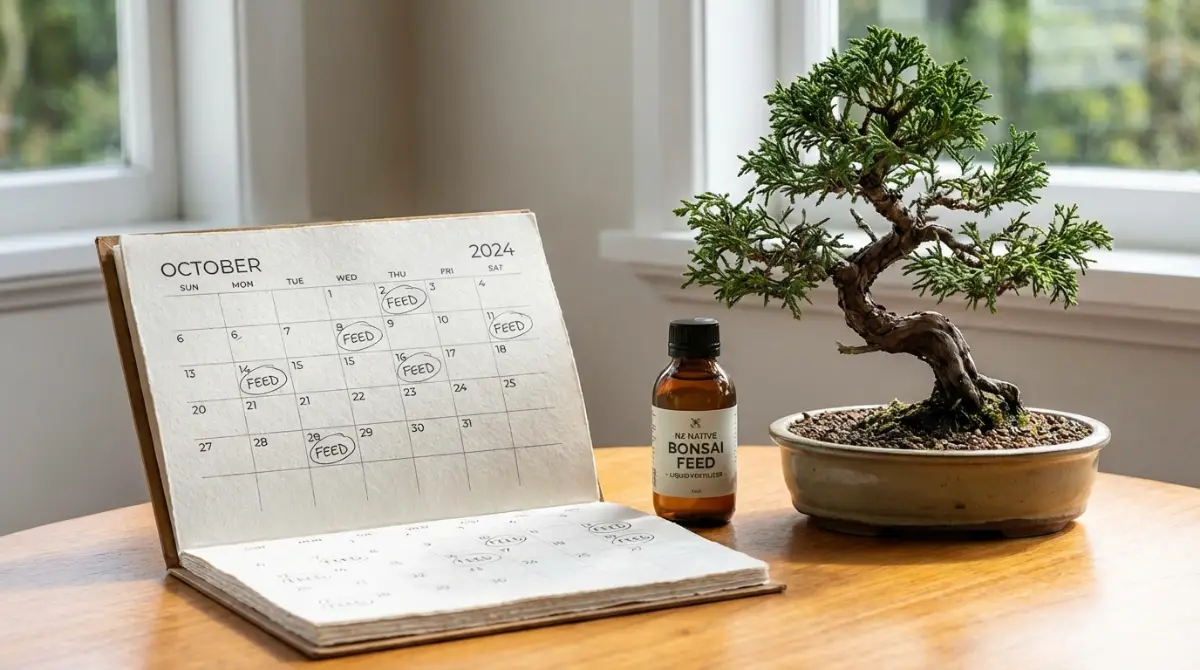
1. Spring: The Growth Surge
As temperatures rise and new buds swell (typically September-November in NZ), begin regular fertilization. For a deeper dive into overall Spring Care for Bonsai, refer to our comprehensive guide. If using solid organic cakes, apply every 4-6 weeks.
2. Summer: Sustaining Vigor
During the peak growing season (December-February), continue with a balanced or slightly lower nitrogen fertilizer. Consider a feed with higher potassium for overall plant health and resilience. Reduce frequency during extreme heat waves to avoid stressing the tree. For some natives, lighter feeding might be appropriate as growth slows slightly in the height of summer.
3. Autumn: Preparation for Dormancy
As growth naturally slows (March-May), transition to a fertilizer with lower nitrogen and higher phosphorus and potassium (e.g., NPK 3-10-10). This promotes root development and hardiness for the cooler months. Reduce frequency to once every 4-6 weeks and cease entirely once deciduous natives drop leaves or evergreen growth significantly slows.
4. Winter: Minimal to No Feeding
For most NZ natives, cease fertilization during the cooler winter months (June-August). Trees are either dormant or their metabolic rate is significantly reduced. Feeding during this period is wasteful and can lead to nutrient build-up or root damage.
5. Monitor & Adjust
Always observe your tree’s response. Signs of nutrient deficiency (yellowing leaves, stunted growth) or excess (leaf burn, rapid leggy growth) indicate a need to adjust your schedule or fertilizer type. Remember, a bespoke NZ native bonsai soil mix provides a stable base, but fertilization is the dynamic art of fine-tuning.
Conclusion: Nurturing Native Resilience
Mastering the art of soil and fertilization for NZ native bonsai is an ongoing journey of observation, learning, and adaptation. By understanding the unique requirements of our indigenous species, crafting custom soil blends, adopting mindful repotting techniques, and implementing a tailored feeding schedule, you lay the groundwork for trees that not only survive but thrive.
Embrace the nuances of each species, trust the science of your NZ native bonsai soil mix, and always listen to what your trees are telling you. This dedication is the hallmark of true high-end aesthetic refinement, allowing the inherent beauty and resilience of New Zealand’s flora to shine through in your bonsai collection. To complement foundational care with structural aesthetics, consider our Bonsai Wire Gauge Guide: Aluminum vs. Copper. Specific techniques for native species, such as How To Wire Totara Bonsai, further enhance artistry. To further optimize environmental conditions for robust growth, consider our guide on Bonsai Grow Lights: Choosing the Right Spectrum. For a broader look at the advancement and recognition of this unique art form, delve into The Future of NZ Native Bonsai: Innovation, Sustainability & Global Recognition.
Frequently Asked Questions (FAQ)
- Q: Can I use regular potting mix for NZ native bonsai?
- A: No, regular potting mix is too dense, retains too much water, and lacks the necessary aeration and drainage for bonsai, especially sensitive NZ natives. It will quickly lead to root rot.
- Q: How often should I water my NZ native bonsai with this custom soil mix?
- A: Watering frequency depends on the species, pot size, climate, and time of year. With a well-draining NZ native bonsai soil mix, you should water thoroughly when the top inch or two of soil feels dry to the touch. It’s better to water thoroughly and less often than lightly and frequently.
- Q: What are the signs of over-fertilization in native bonsai?
- A: Signs include leaf tip burn, yellowing of foliage, stunted growth despite feeding, salt crust on the soil surface, or a sudden flush of weak, leggy growth. If you suspect over-fertilization, flush the soil thoroughly with plain water.
- Q: Should I sterilize my soil components before mixing?
- A: Most commercially available inorganic components like pumice and scoria are clean. For organic components like bark, ensuring they are aged and free of pests or disease is important. Sterilization is not typically required if you source from reputable suppliers.
- Q: Can I reuse old bonsai soil?
- A: It’s generally not recommended, especially for sensitive natives. Old soil is depleted of nutrients, structurally degraded, and may harbor pathogens or pests. Always use fresh NZ native bonsai soil mix during repotting.